

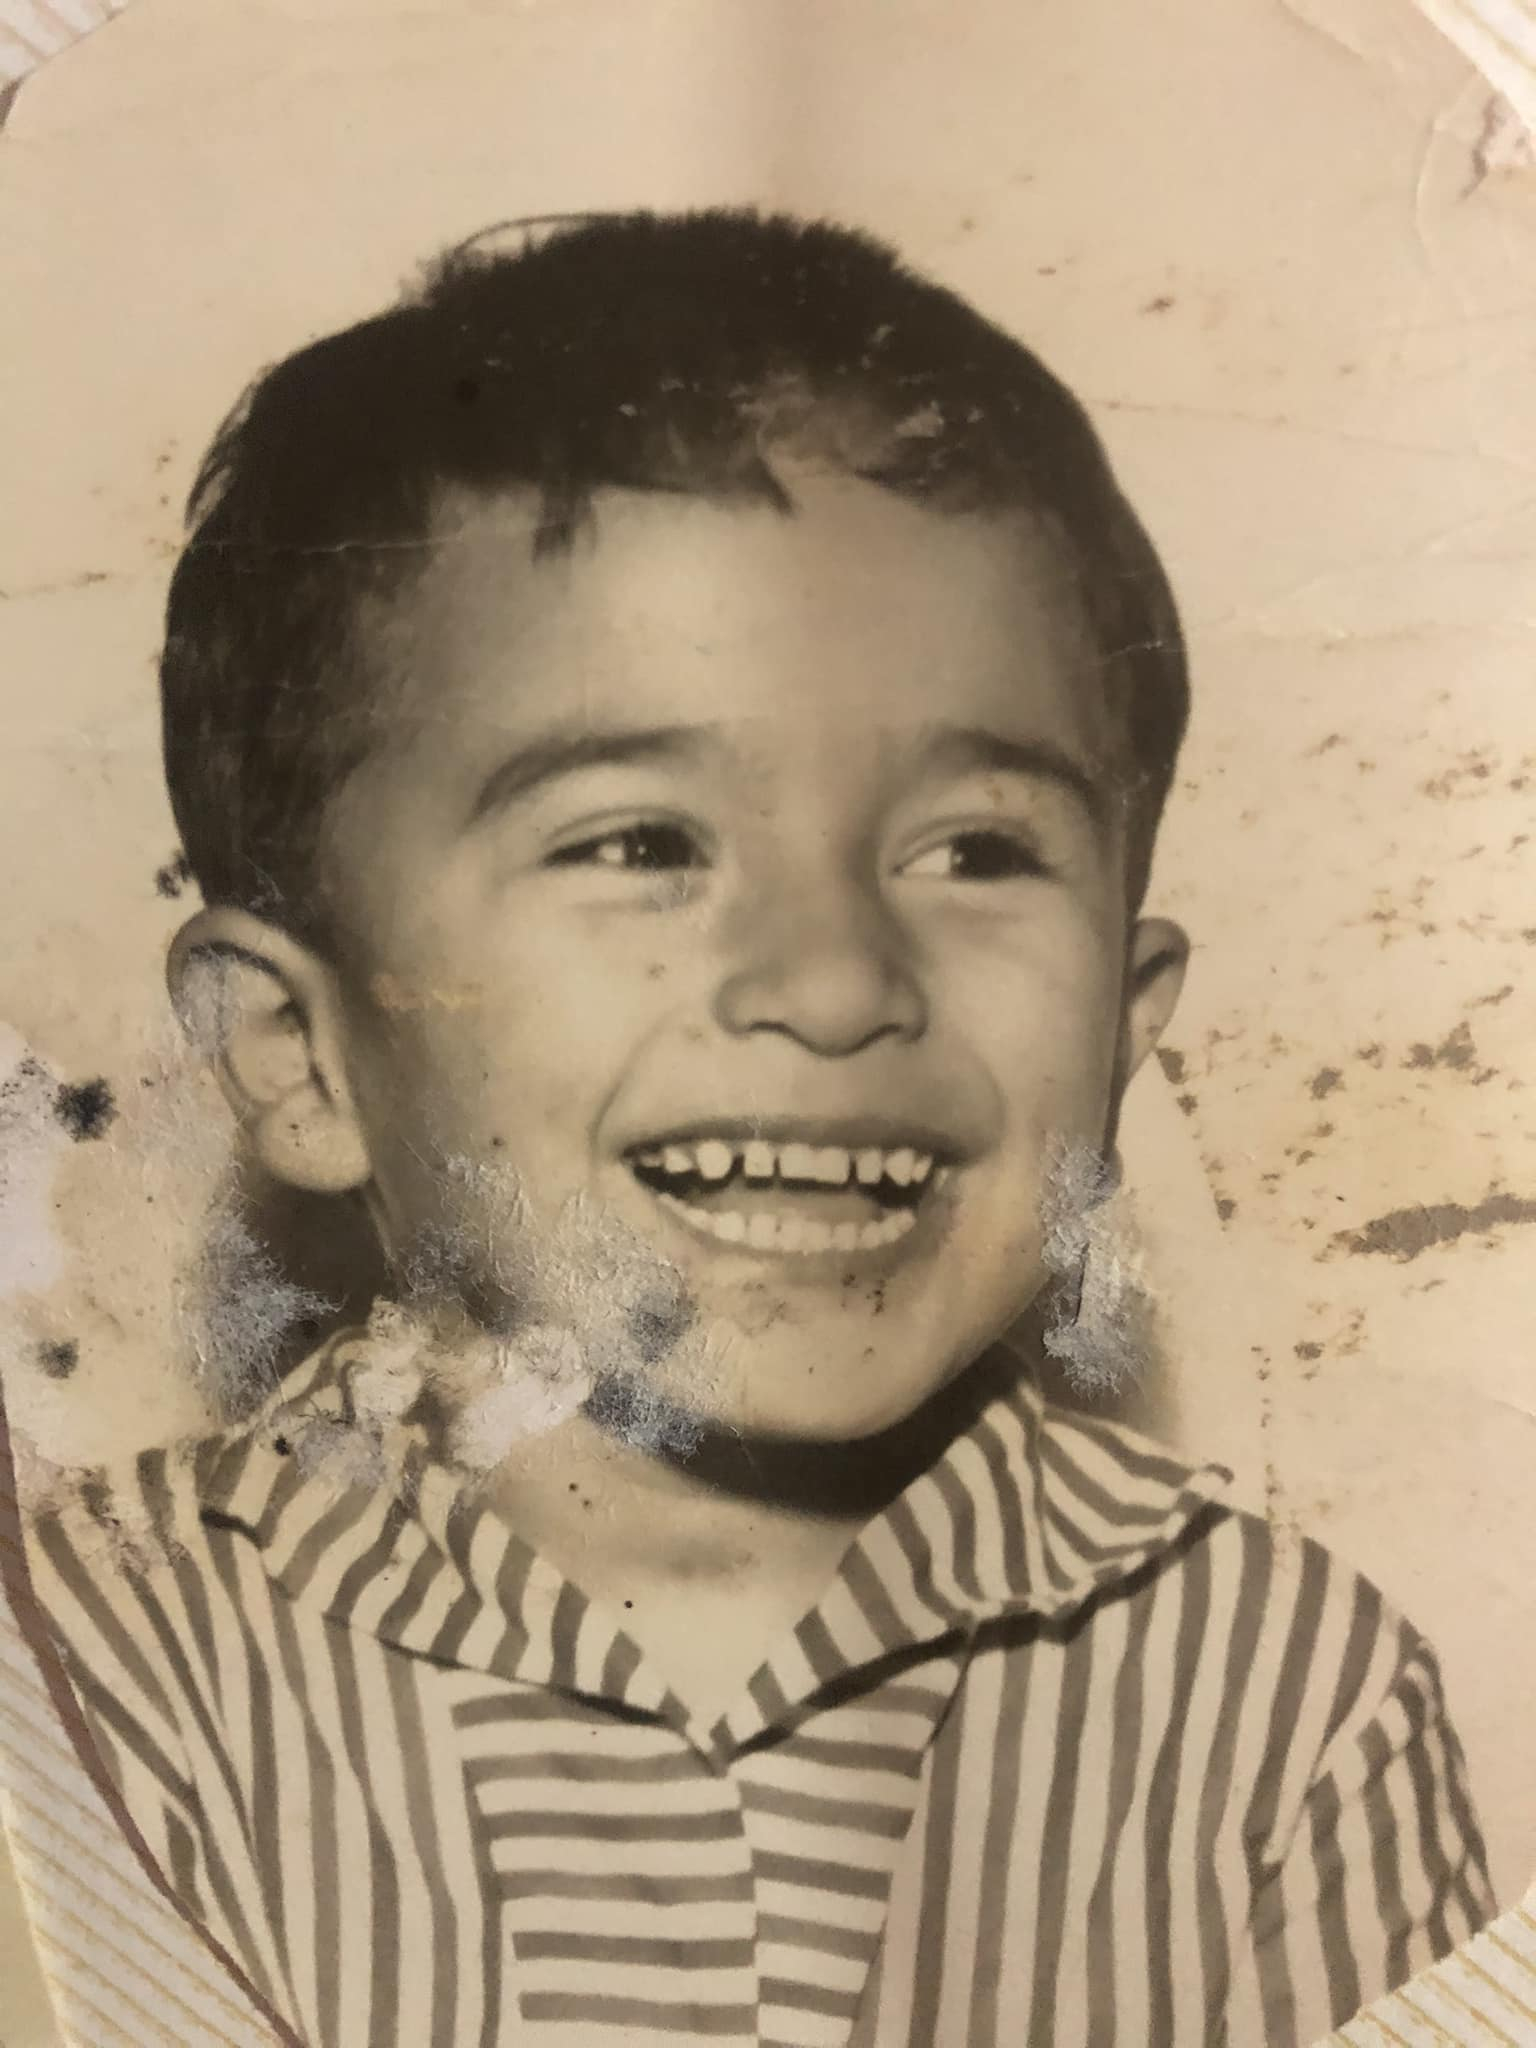
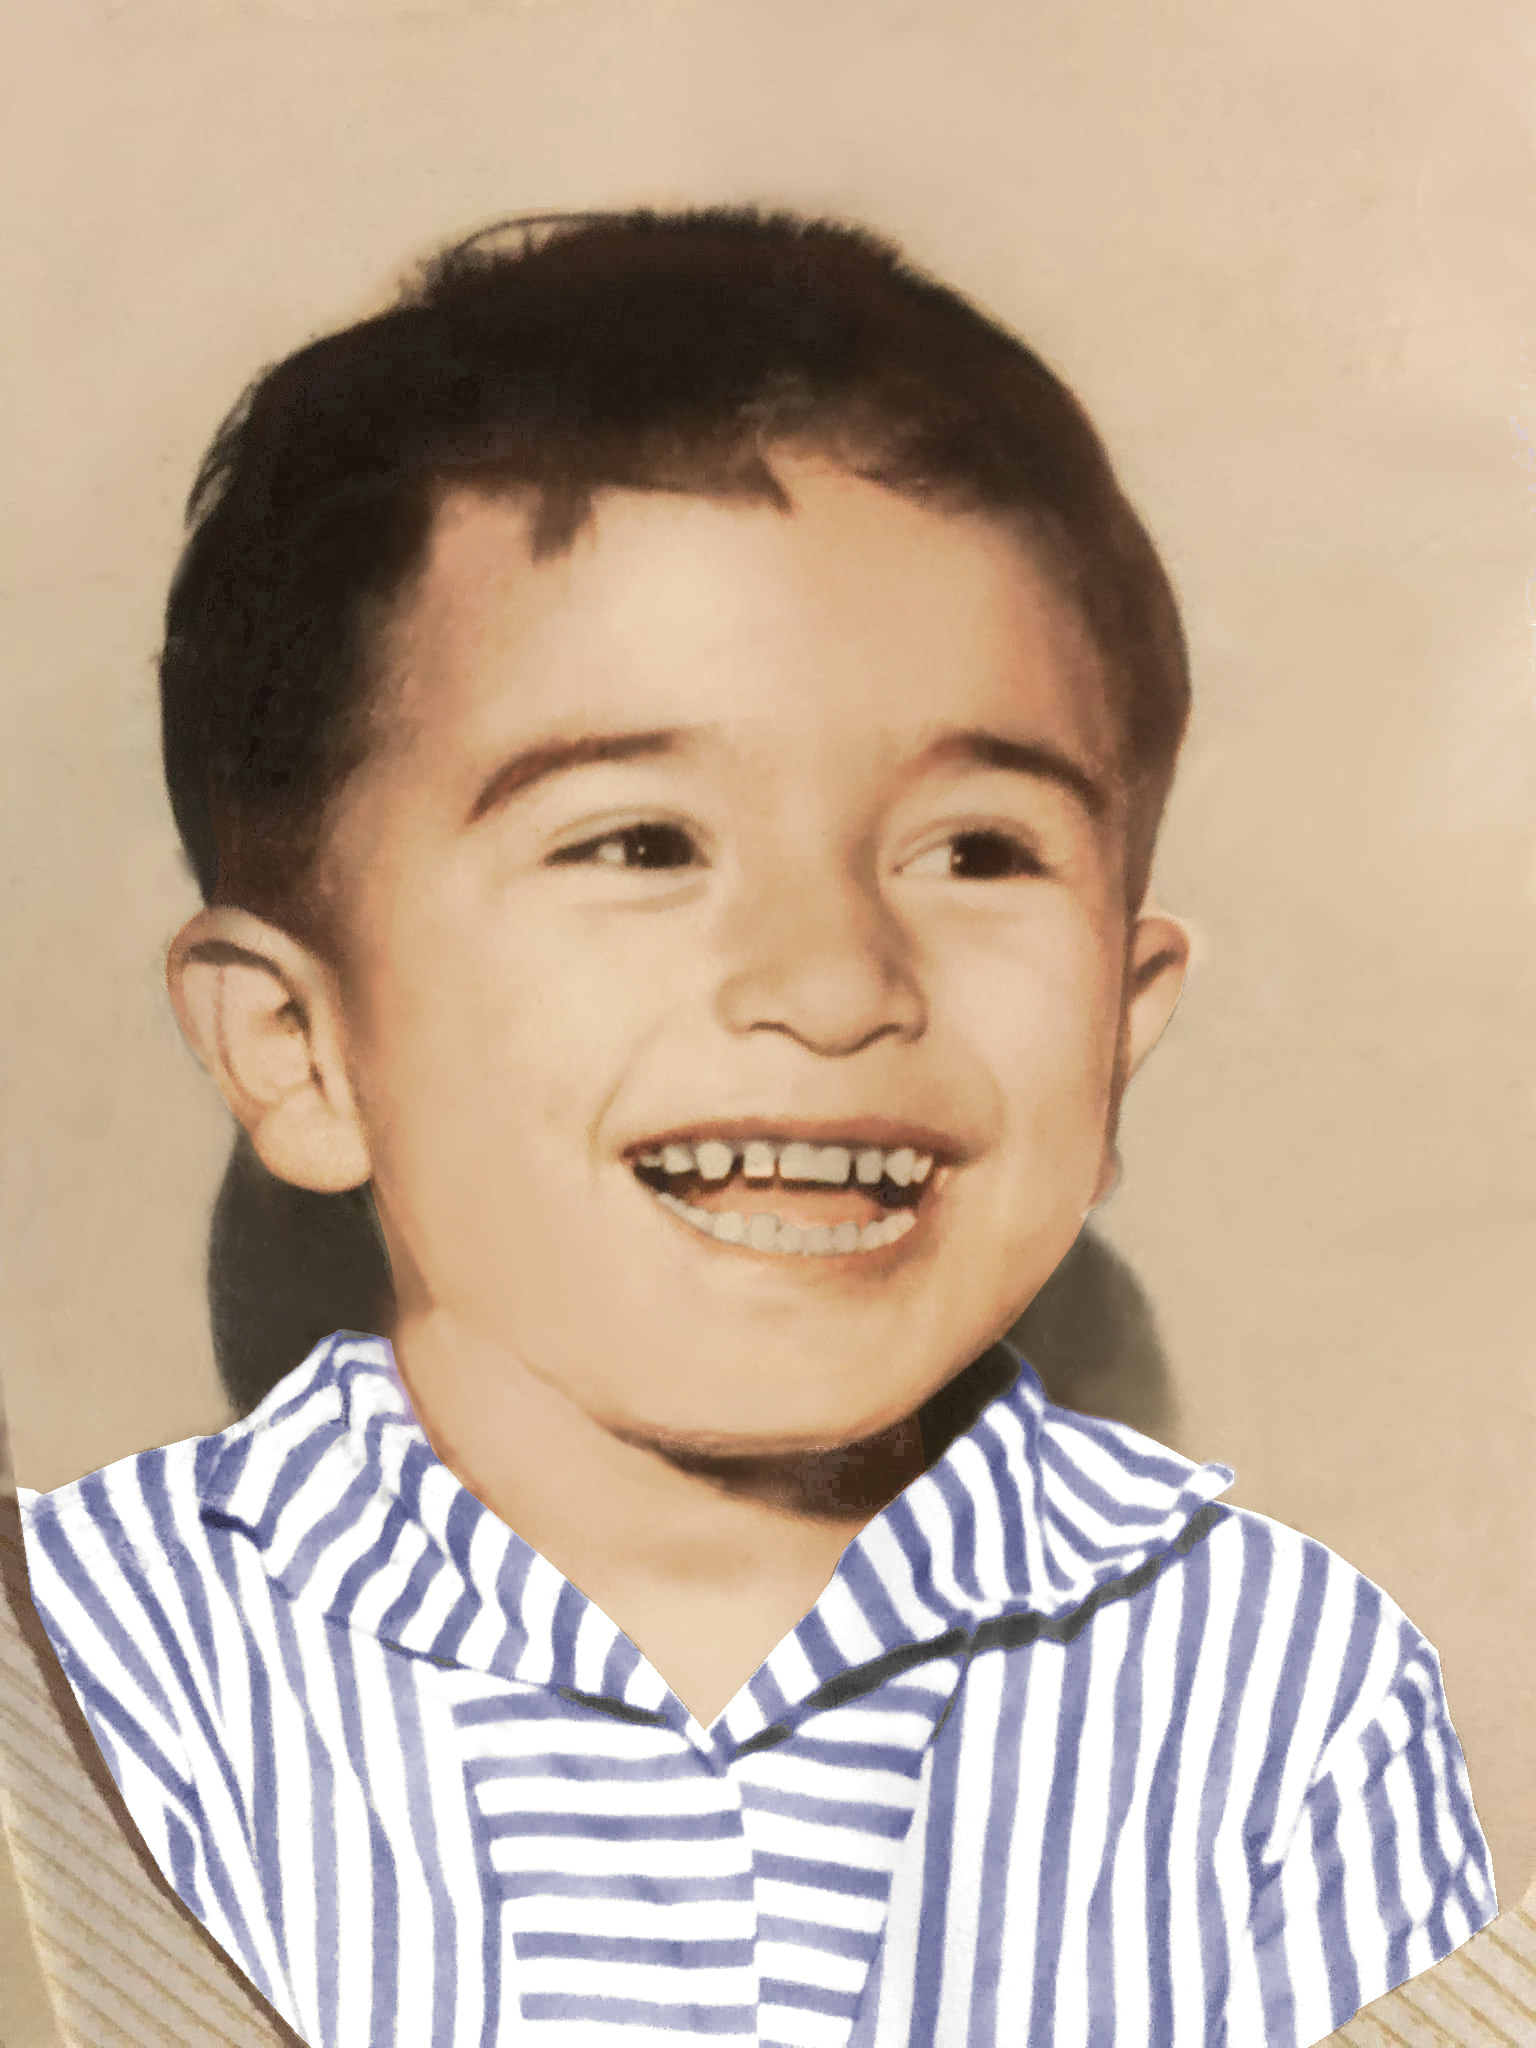
Example 1: Torn to shreds
Condition: Obvious damage and missing areas to recreate
Size: 78mm X 140mm
Request: Recreate a complete picture
In this repair, the photograph had definitely been through some major trauma!
Our job was very clear: repair the damage and leave the client with a complete picture, not a jigsaw puzzle.
These jobs can often be difficult, especially with damage through the faces, because while we can recreate features, it’s not always possible to be able to recreate the likeness of someone.
In this instance however, the likeness wasn’t an issue as there was enough detail there to be able to repair, rather than recreate.
The finished image was shorter than the original, as there was no detail in the lower quarter of the original image.
Thankfully, the client was more than happy to lose that and gain what was above.
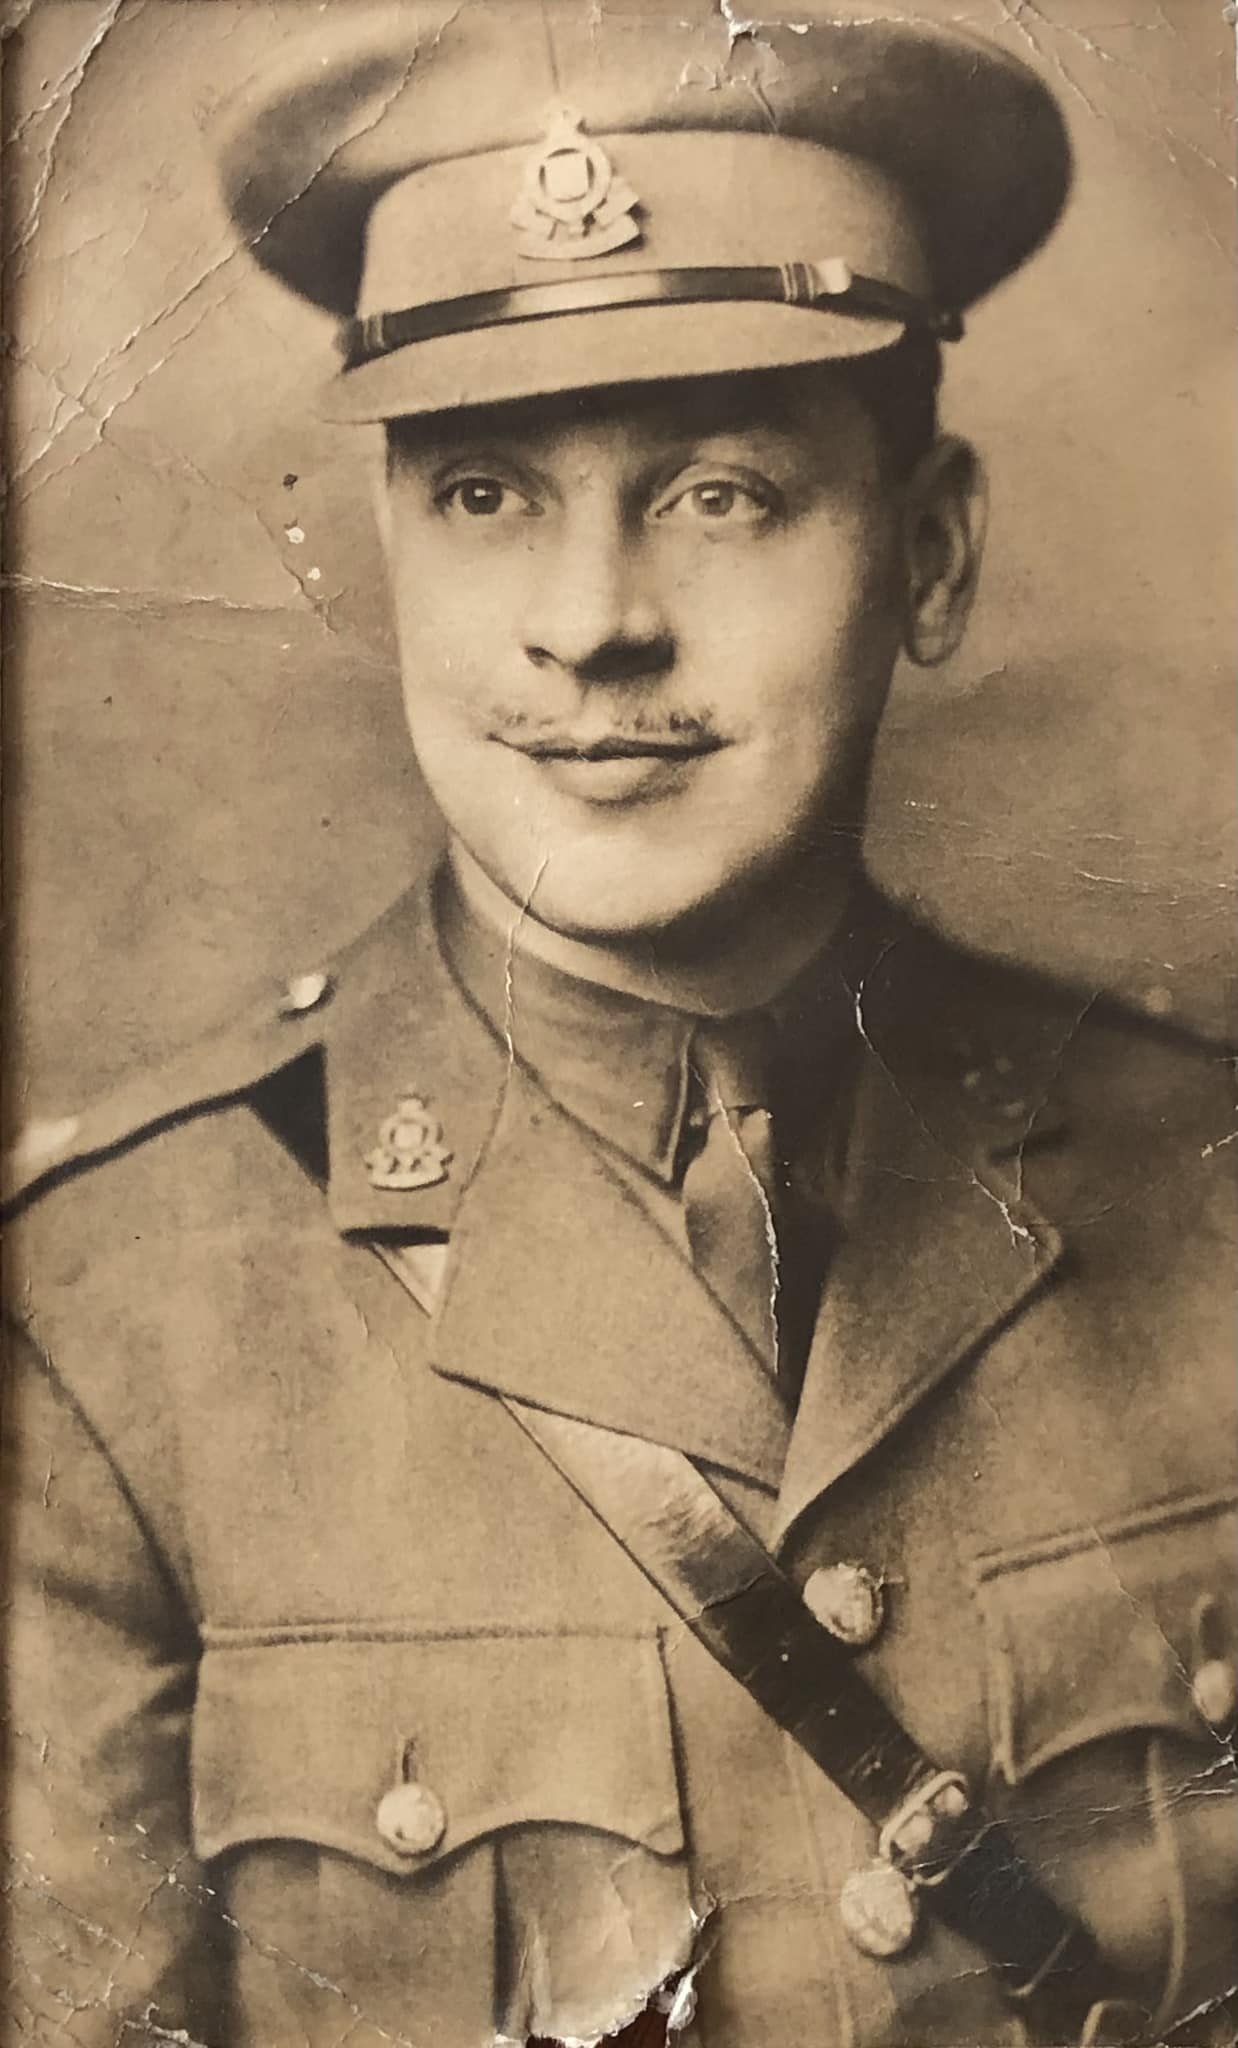

Example 2: The officer
Condition: Creases and tears
Size: 105mm X 173mm
Request: Repair creases and tears and colourise
The client’s request was to clean up the photo and to add colour. The important thing from our perspective was to get the colouring correct, or as close as possible. Not just the man’s face, but more importantly, the uniform. The client didn’t know which branch of the military he was part of, so we did a bit of research to discover that he was probably with the Royal Army Ordnance Corps. Thankfully, the badge was easy to track down.
It transpires, through their own research, the client had also discovered that the photographed man was a Lieutenant in the RAOC.
Example 3: Creased and very small
 Condition: Poor. Multiple creases. Little detail.
Size: Tiny.
Request: To make the picture sharper and remove the creases.
This picture is no bigger than a postage stamp at 308 by 450 pixels and 300 dpi. It is why we now insist that clients provide us with high dpi scans of their photos. Had the client done so, the level of detail would have been considerably better. Unfortunately, in this case, that was not possible.
We could have used software enlarge the picture, but it would not have improved the level of detail and could have worsened what little detail there was.
In fact, the people are not the only elements of the photograph to have suffered from poor detail, however, we made every effort to ensure that future clients provide us with better quality images to begin with.
With the improvements we made to the only surviving photograph of the people in the picture, the result made for a very happy client.
Example 4: Folds and blurring
 Condition: Relatively good.
Size: Good.
Request: To make the picture sharper and remove the fold, minor scratches and other blemishes sustained over its sixty-plus year life.
The image had a crease from top to bottom, in addition to some noticeable blurring. Removing the crease was quite time consuming, owing to details around the area of the crease itself, but the bigger issue was the fuzzy nature of the photograph.
While some fuzziness can be rectified, not all of it can. Surprisingly, it’s one of the most requested fixes. Sadly, the fuzziness here could not be wholly rectified, although we did manage to improve it.
The rest of the repair, was pretty straightforward. Using a high resolution scan to work on, gave us an excellent image to work with.
Example 5: Restoration with colouring
 Condition: Some damage to the face and background. Two small areas missing.
Size: Reasonable.
Request: To repair the damage and add colour.
Not only was this image a lot bigger than the first example, but the child was the sole subject. The increased size made restoration and colouring much easier.
In addition to the restoration, this was colourised. We recommend that all photos at least have scratches and scuffs or creases removed, as colourising can often highlight these imperfections.
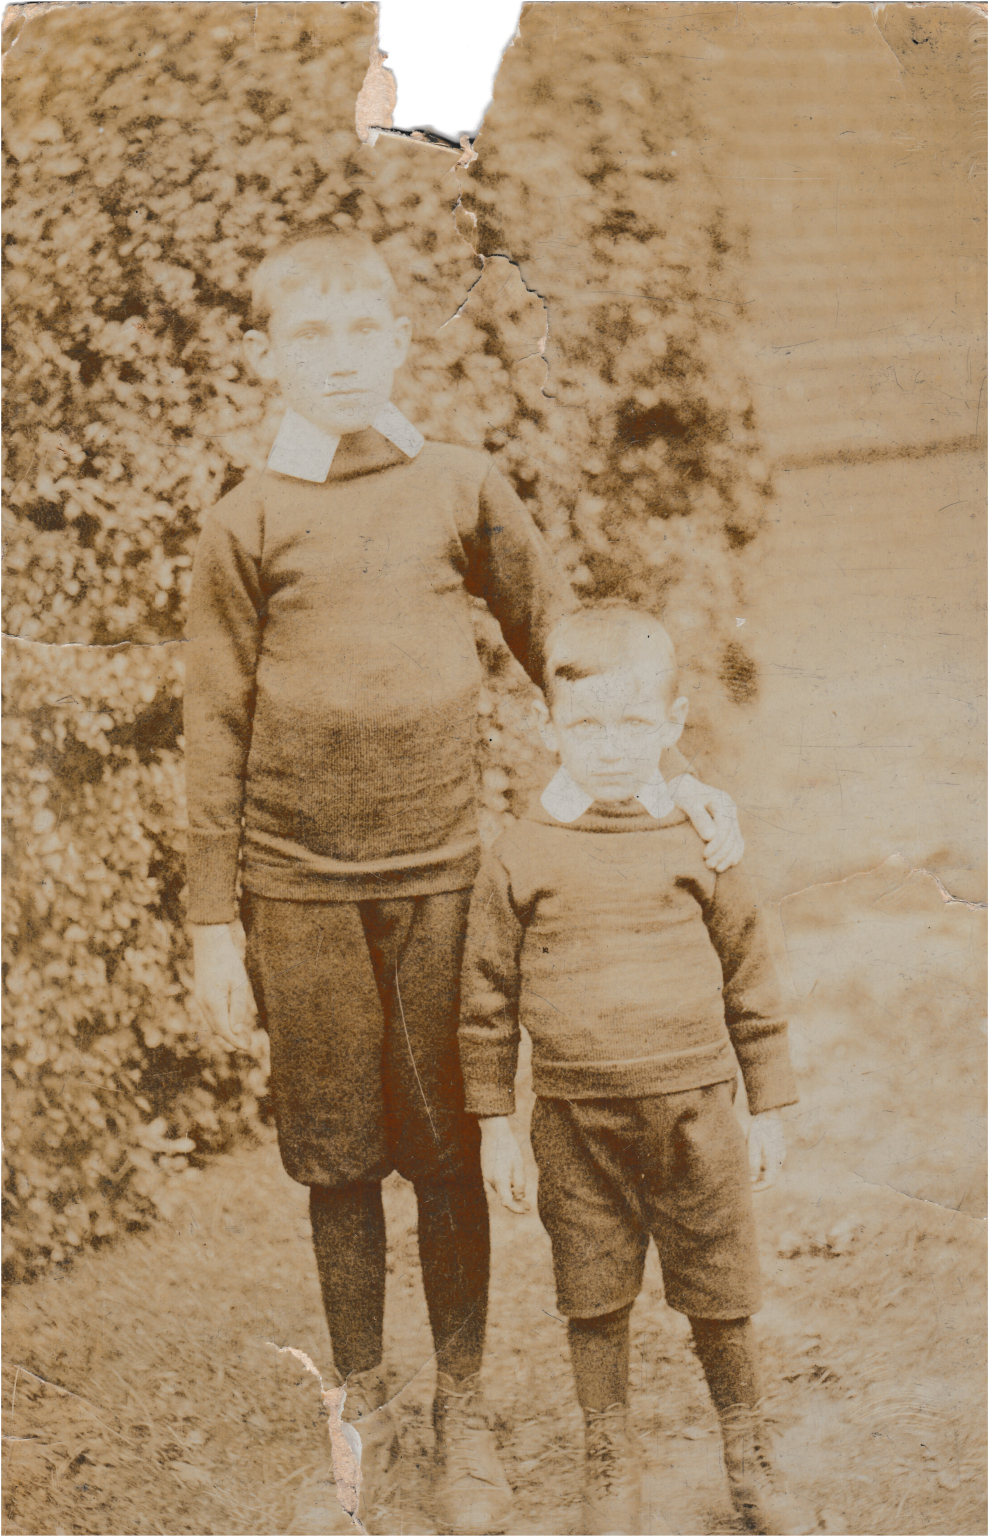
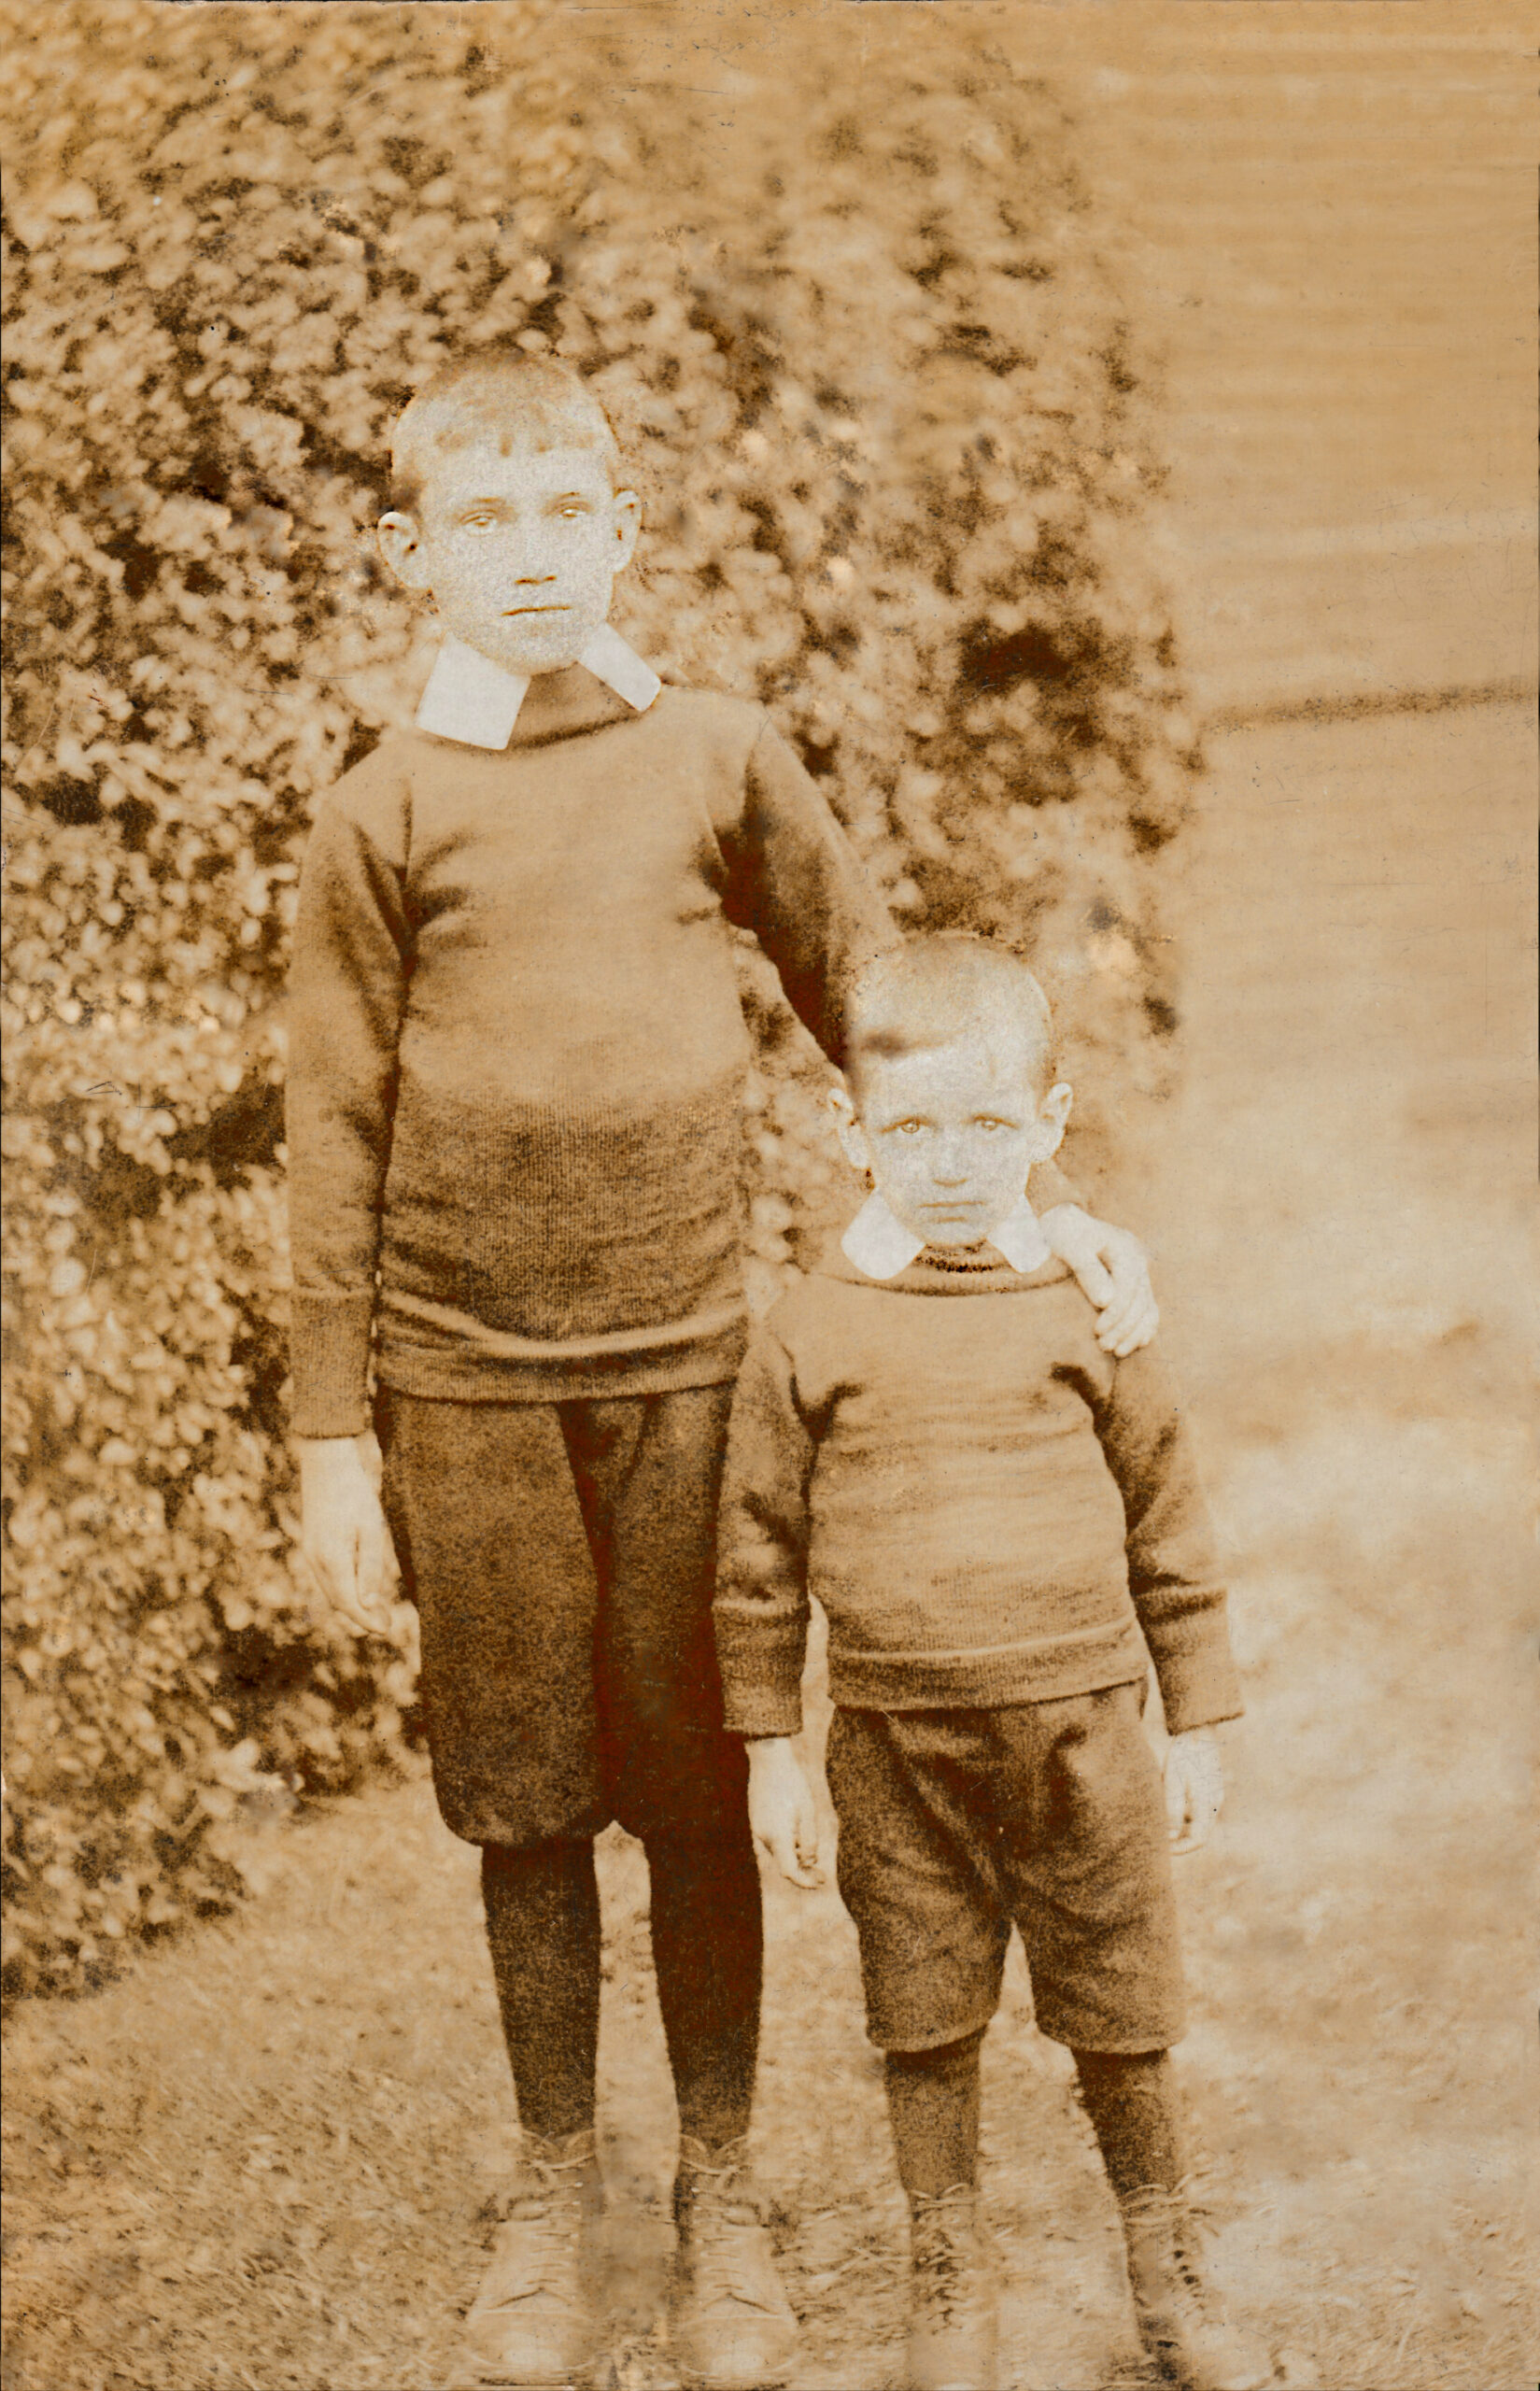
Example 6: Tears
Condition: Multiple tears and a small area missing. Deep scratches and degradation to the image over its 100+ years.
Size: Small postcard. 83mm X 130mm
Request: To repair the damage and improve as far as possible.
We could only improve the clarity of the boy’s faces following the removal of all the scuffs and scratches.
The faces unfortunately had washed out to such a degree, that restoration to “like new” was not possible.
Example 7: Colour correction and sharpness
 Condition: Good, but lighting poor
Size: 3.3 X 5
Request: Improve the dullness of the print and sharpen the information
This picture required better clarity and brightness.
We adjusted the contrast and colour balance before we sharpened the image, which then allowed the man’s chequered shirt to show, instead of appearing plain.
The result is a strong, bright image with plenty of detail.
In his instance, we did not change anything else in the picture. There is light scuffing and one or two other blemishes, but it’s a good example to show that a picture like this can be vastly improved for very little money.

Example 8: General reparation
Condition: Reasonable but with some obvious damage in places
Size: 170mm X 123mm
Request: Improve the photo generally and repair the damaged areas
This photo turned up, but we have no idea when it’s from. The likelihood is that it’s from somewhere between the 1930’s and the 1950’s. The fact that two of the people in the image are wearing uniforms suggests that it was taken during WWII.
The photo had lost a lot of its sharpness and contrast. In addition, there were a couple of areas where damage had occurred.
Oddly enough, the repairs weren’t that much of an issue although, they did require a little artistic licence. The issue was that it had been scanned at 1200 dpi. This meant we could get right up close, which highlighted so much of the general wear and tear that occurs naturally. The question then became where to stop.
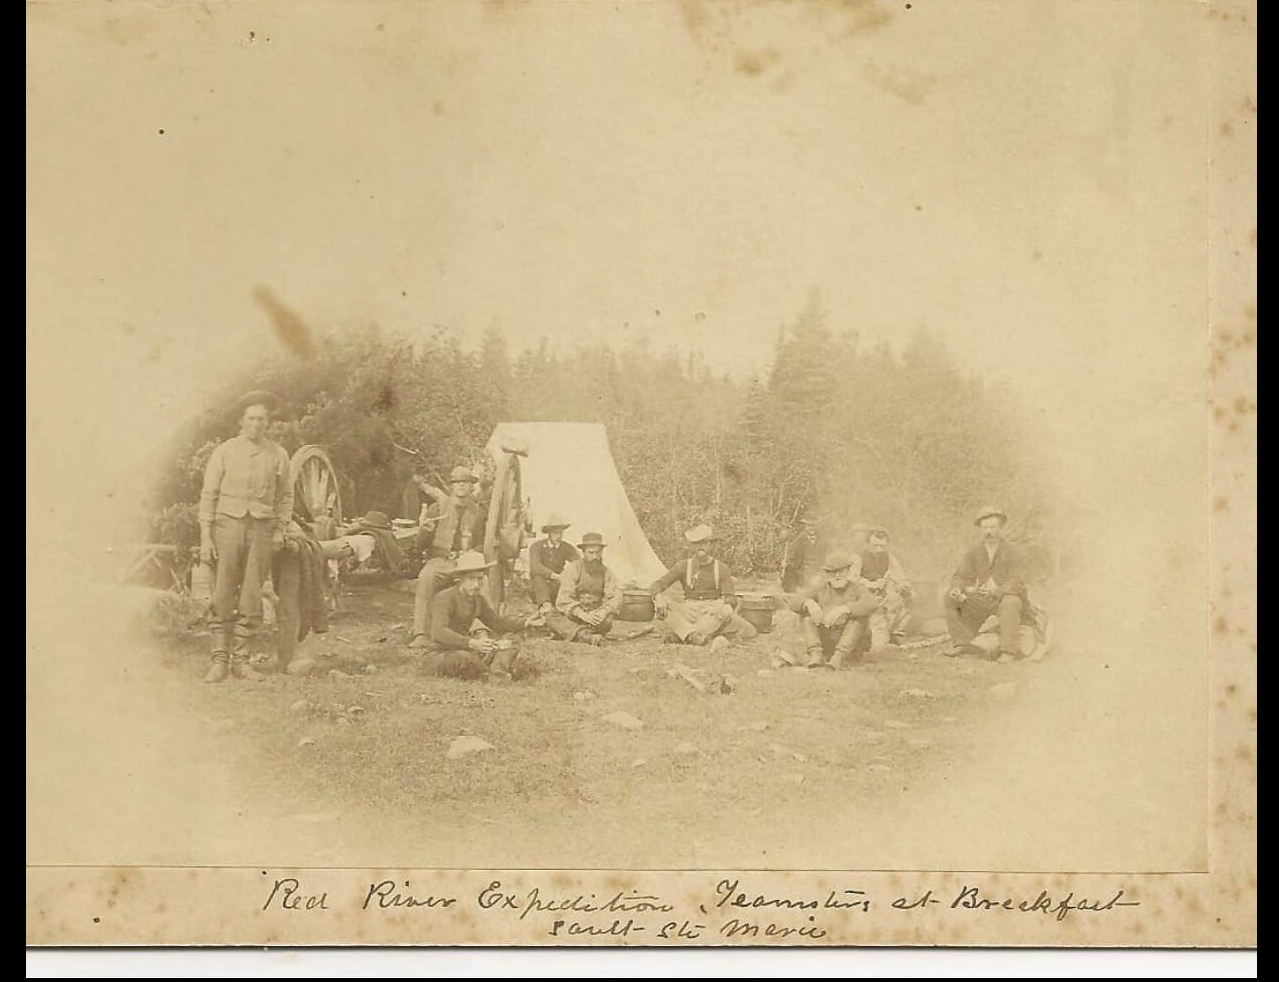
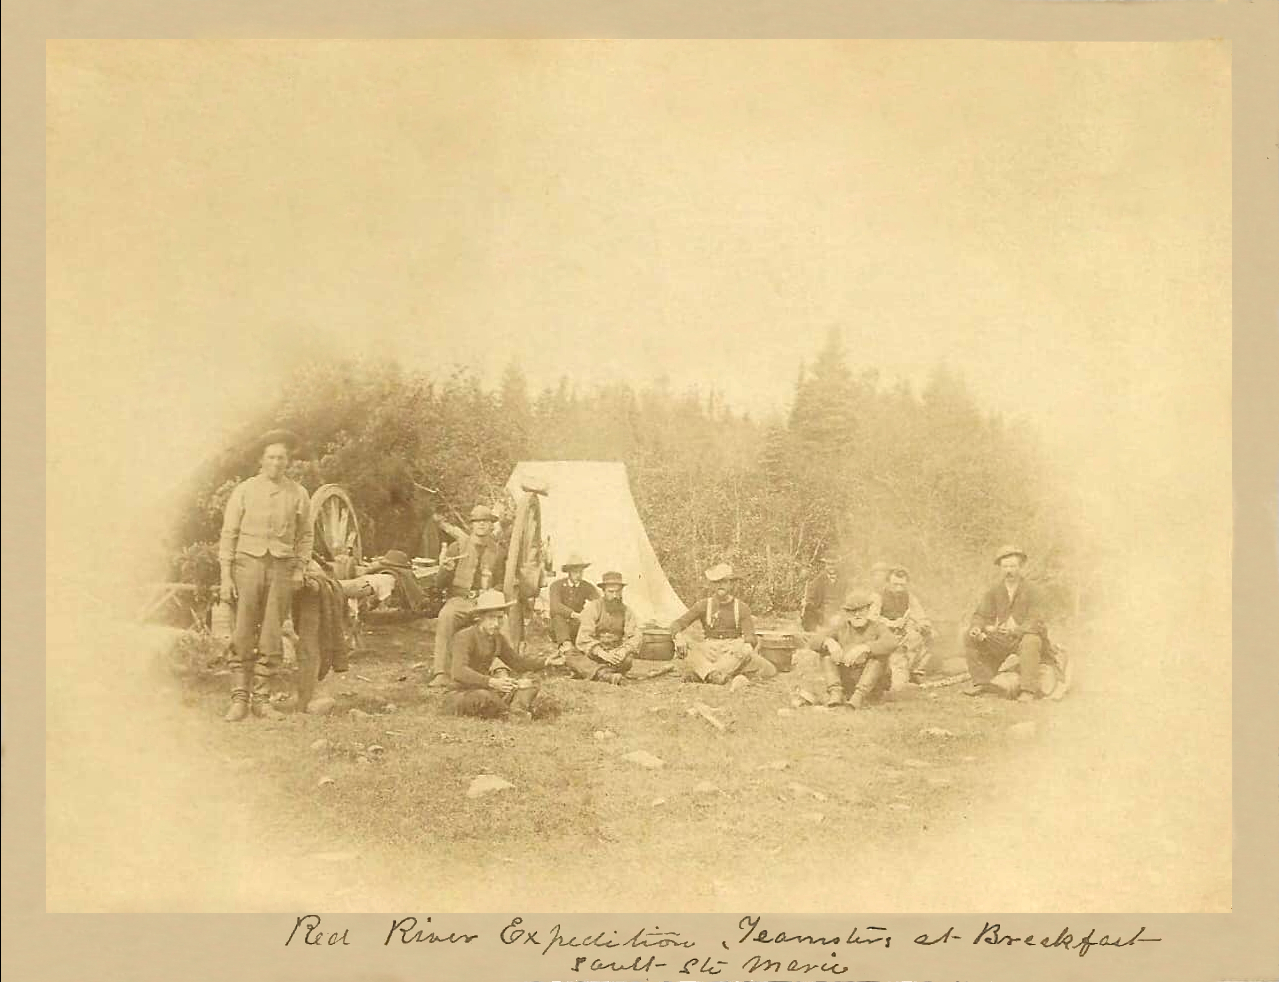
Example 9: Historic repair
Condition: Obvious foxing to remove
Size: 108mm X 83mm
Request: Clean up foxing and improve contrast
My thanks to the kind people at Parry Sound, Ontario, Canada for allowing me to work on this.
This photo came to us needing a clean up and it’s one of those occasions where we wished it had been a higher dpi scan, but sometimes you have to work with whatever you’re given.
Being historically significant, we were mindful to repair as little as possible, so the overall look remained one that may well have come from Victorian times and we hope we achieved that. It was a real pleasure to get to work on something that old.
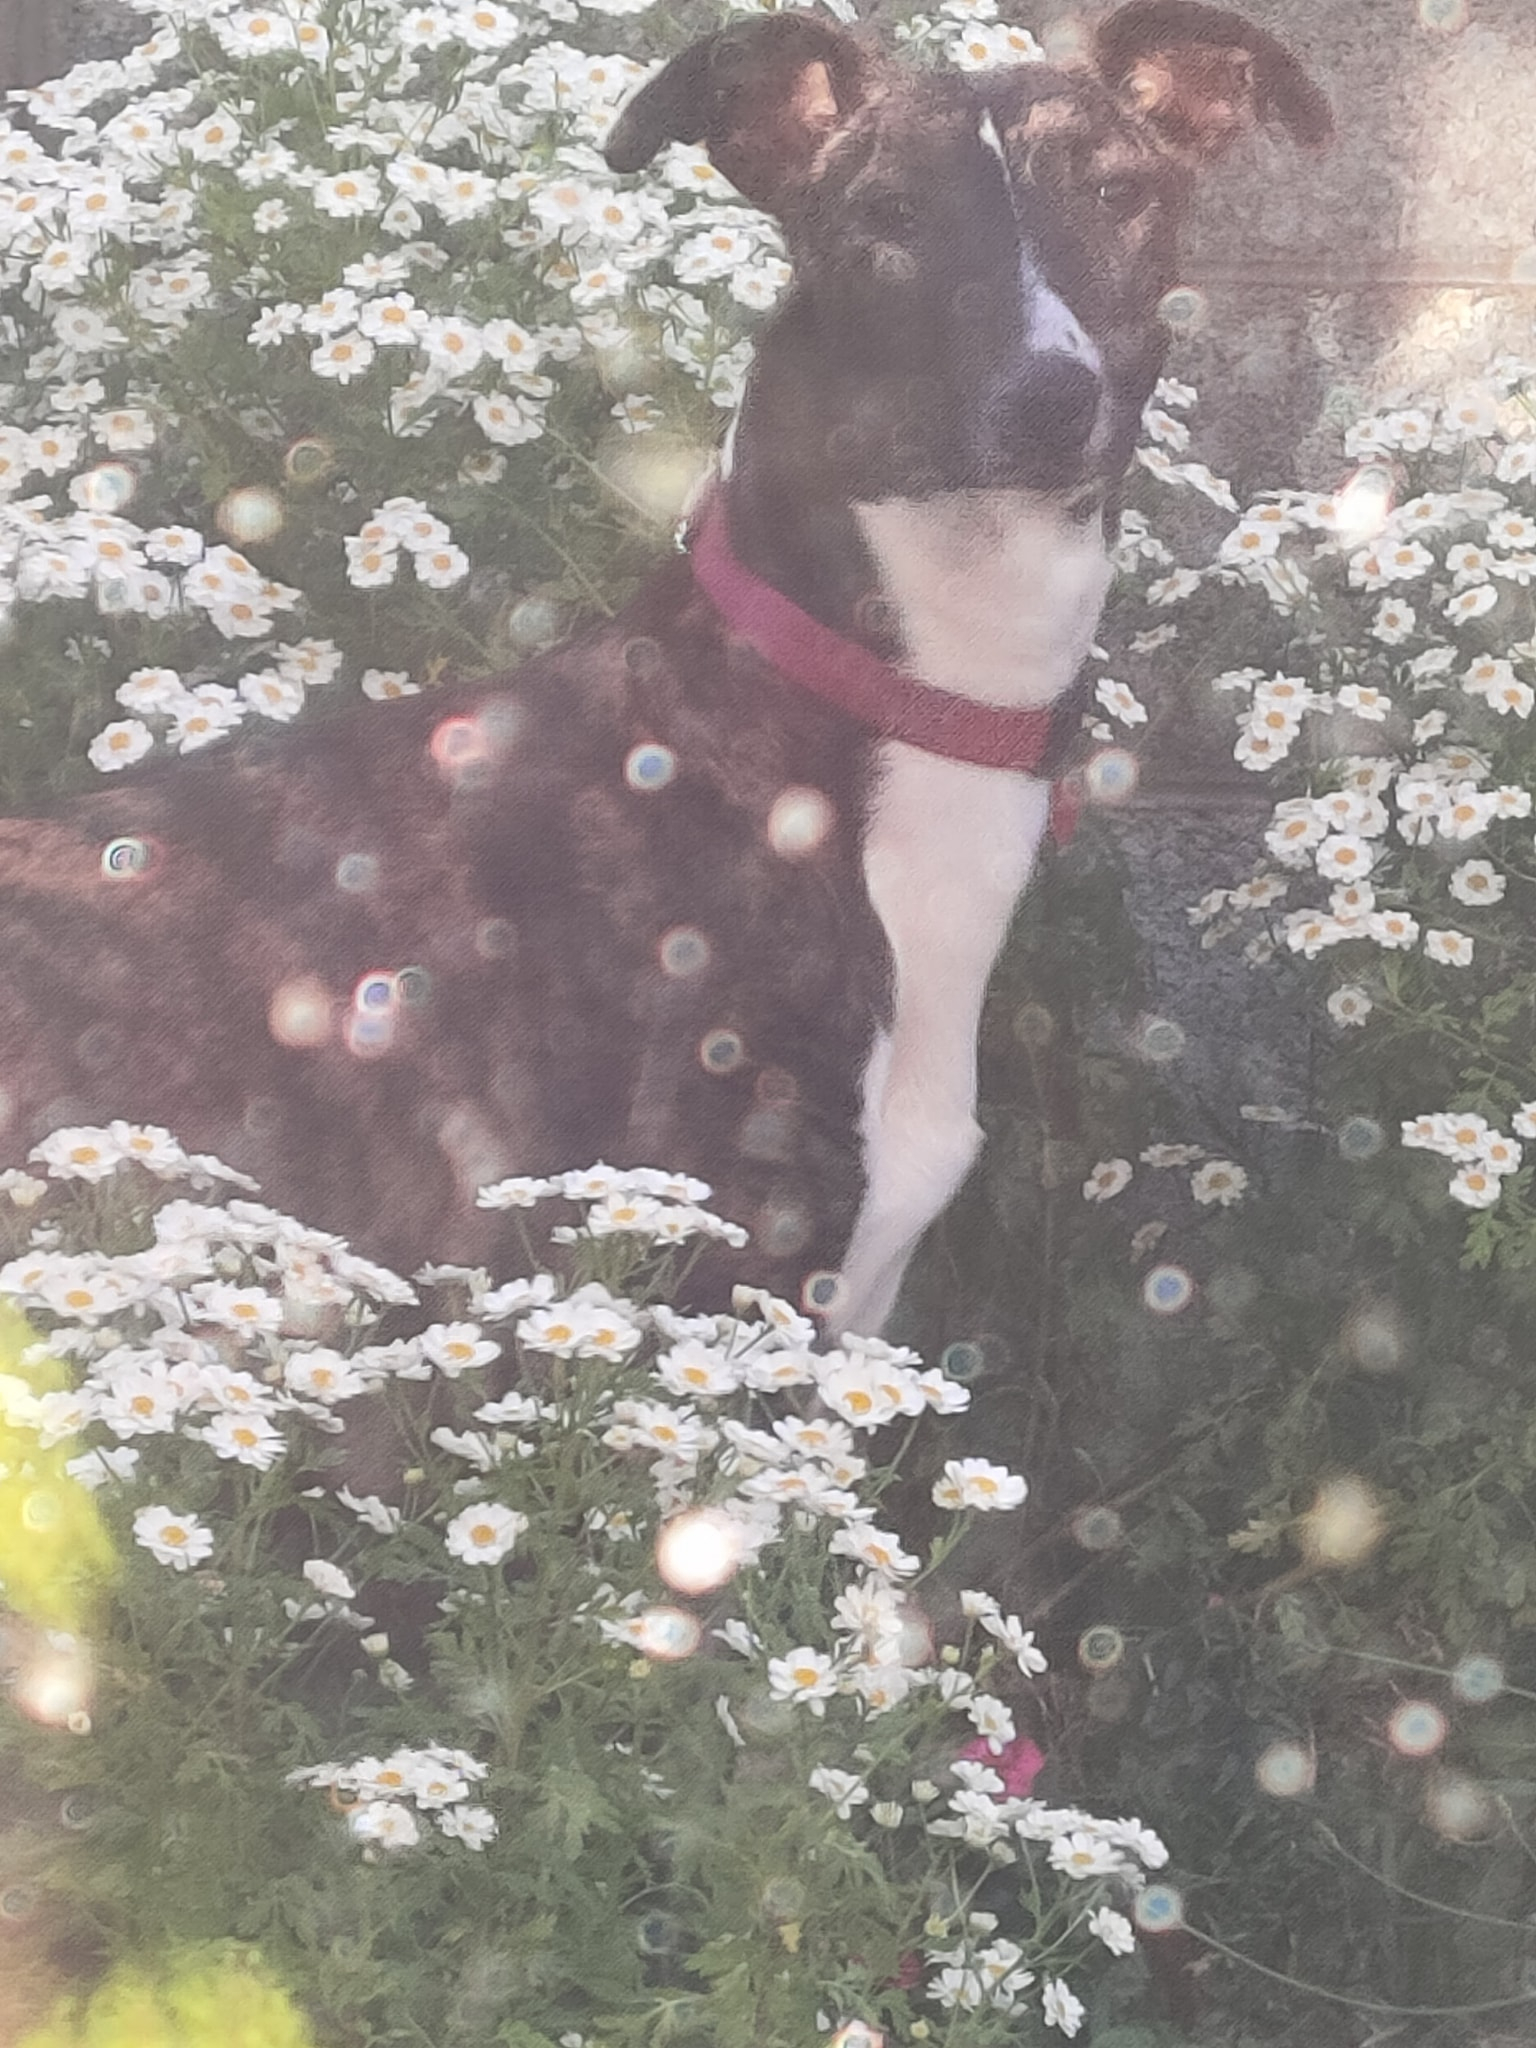
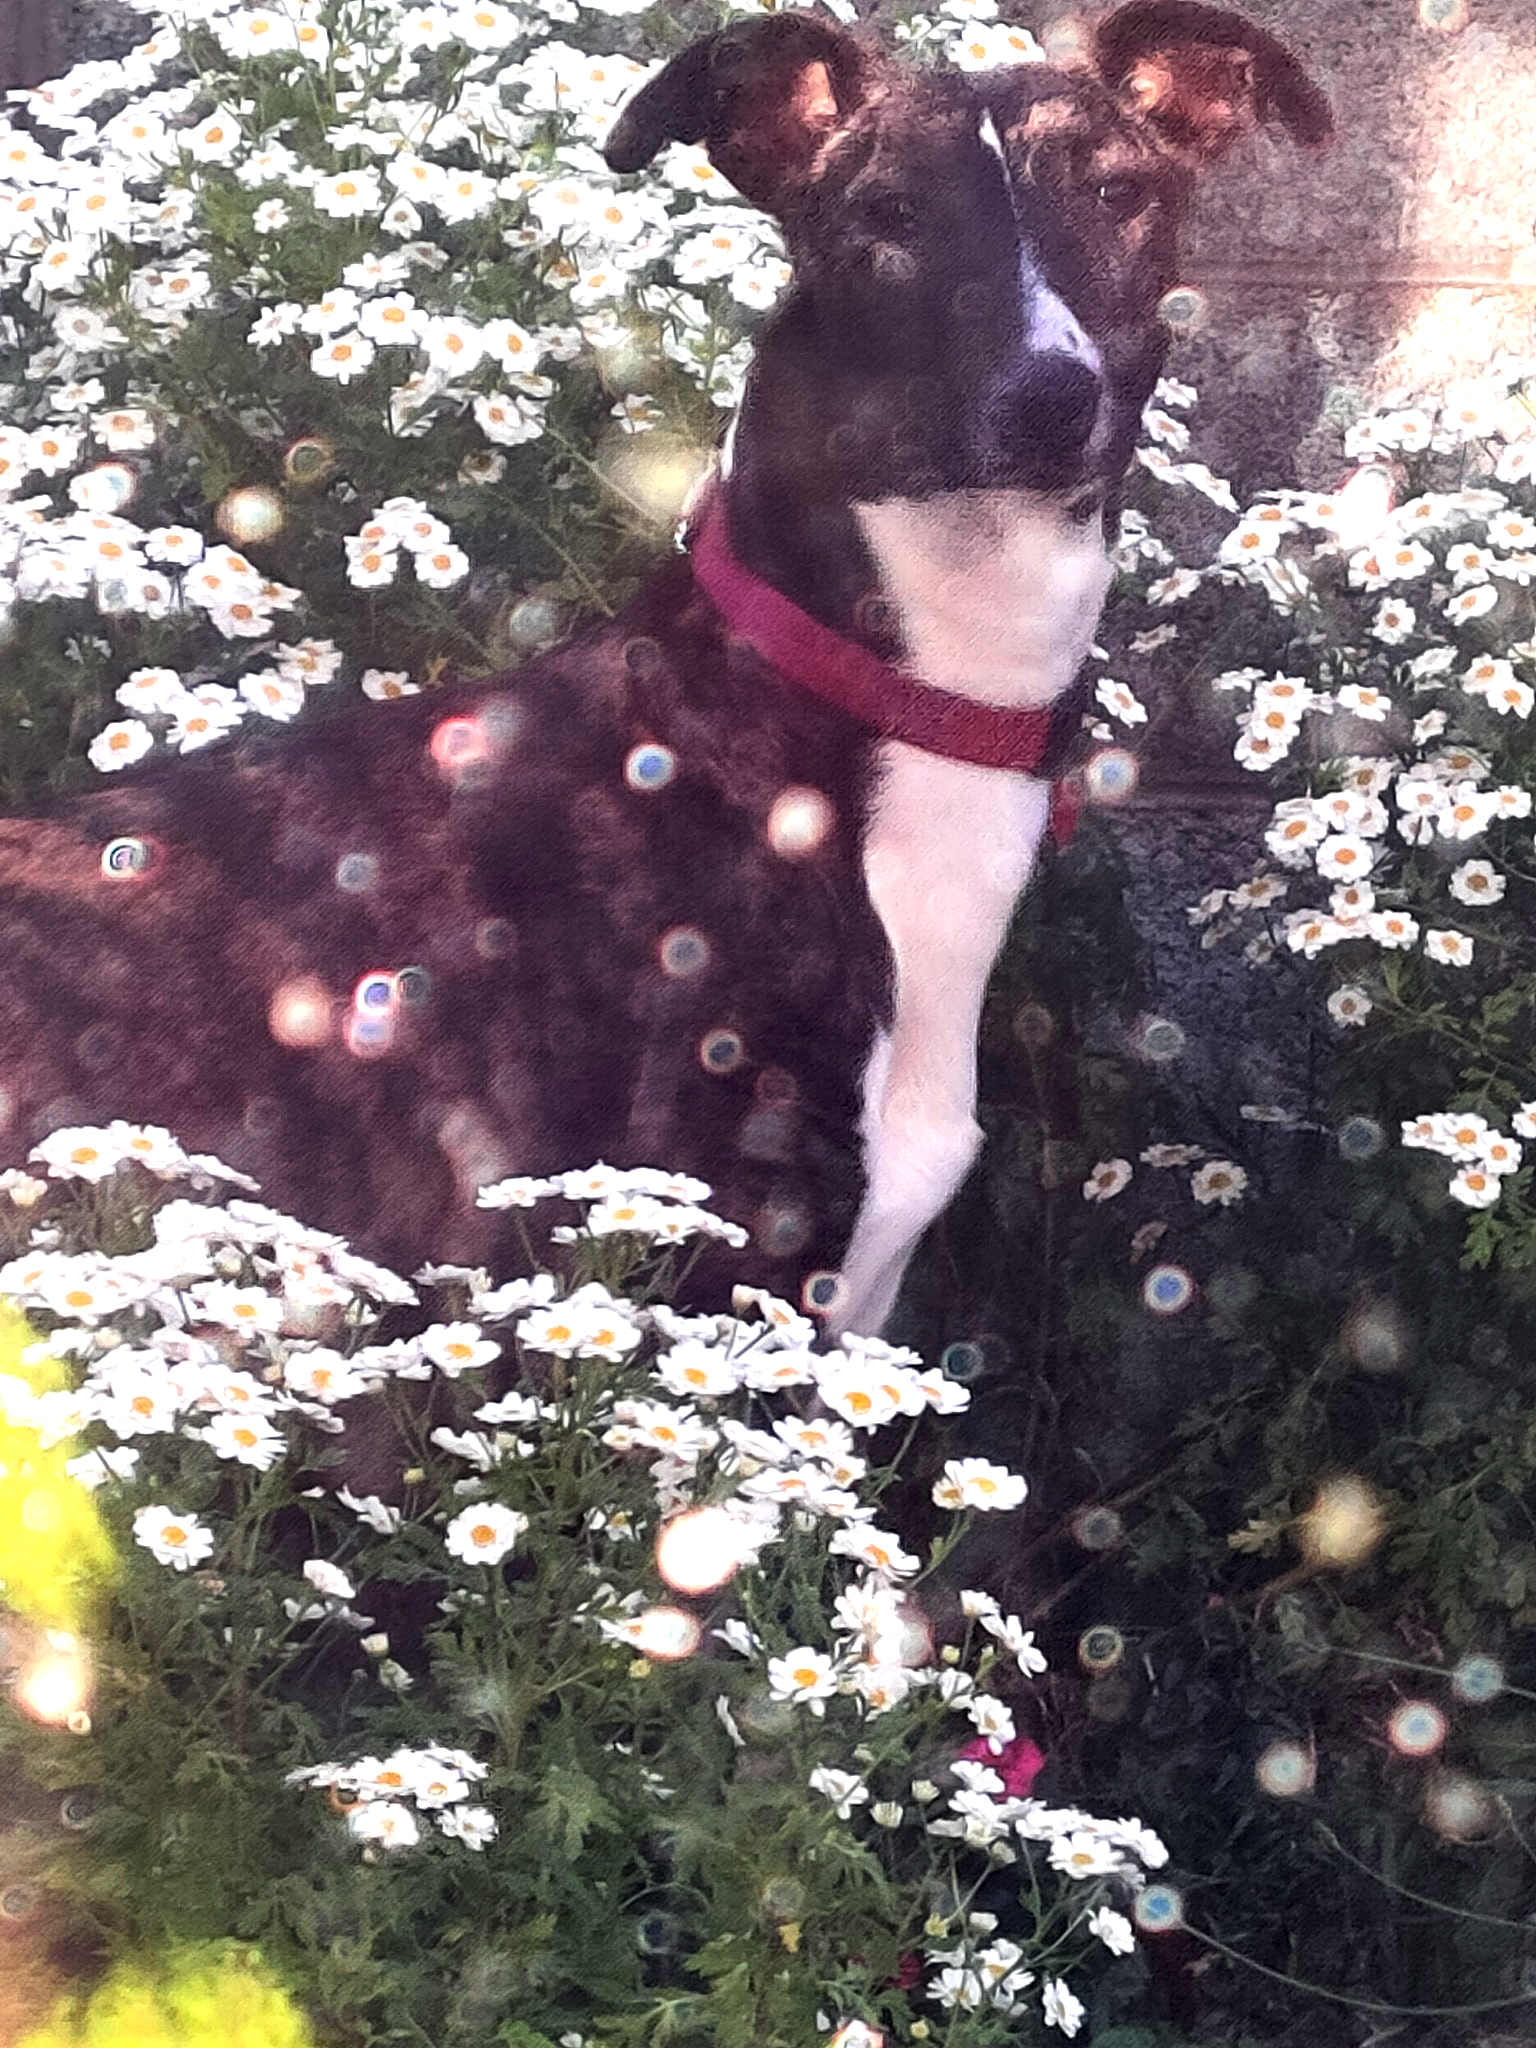
Example 10: Simple colour restoration
Condition: Colour restoration
Size: 130mm X 173mm
Request: Make the colour vibrant again
My thanks to Helen for this one.
As you can see in the before and after images, this photo was lackluster and faded. We weren’t sure whether the sparkles were to be kept or not. We thought they added a kind of ethereal quality, so left them in.
Thankfully, the customer was well pleased and so were we.
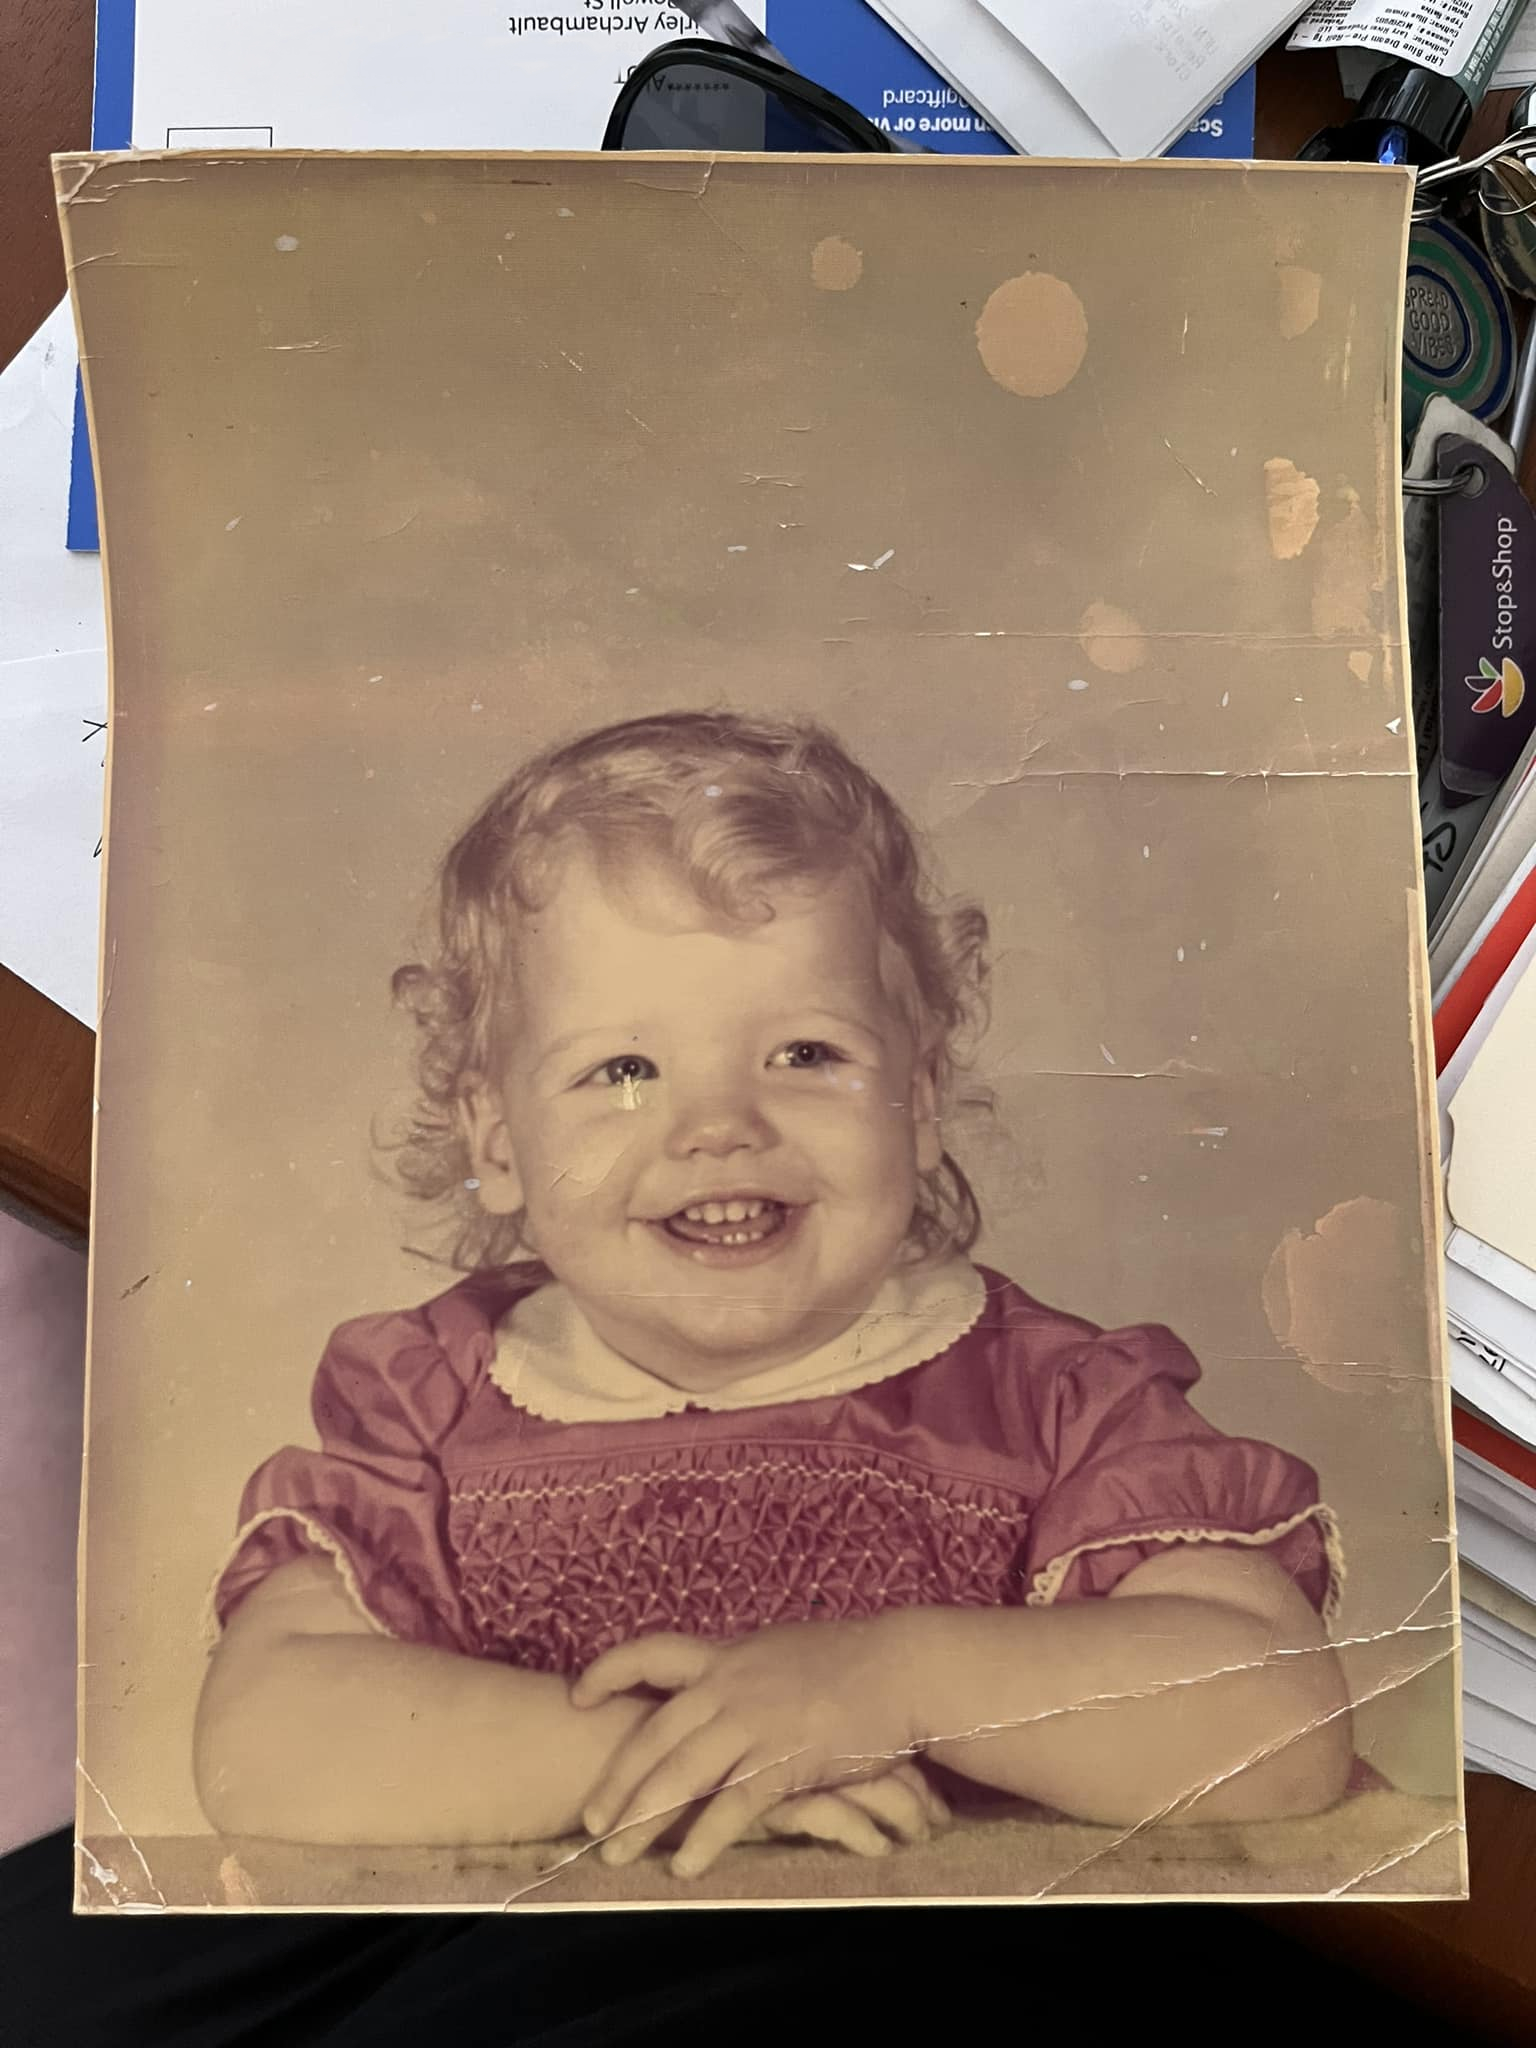
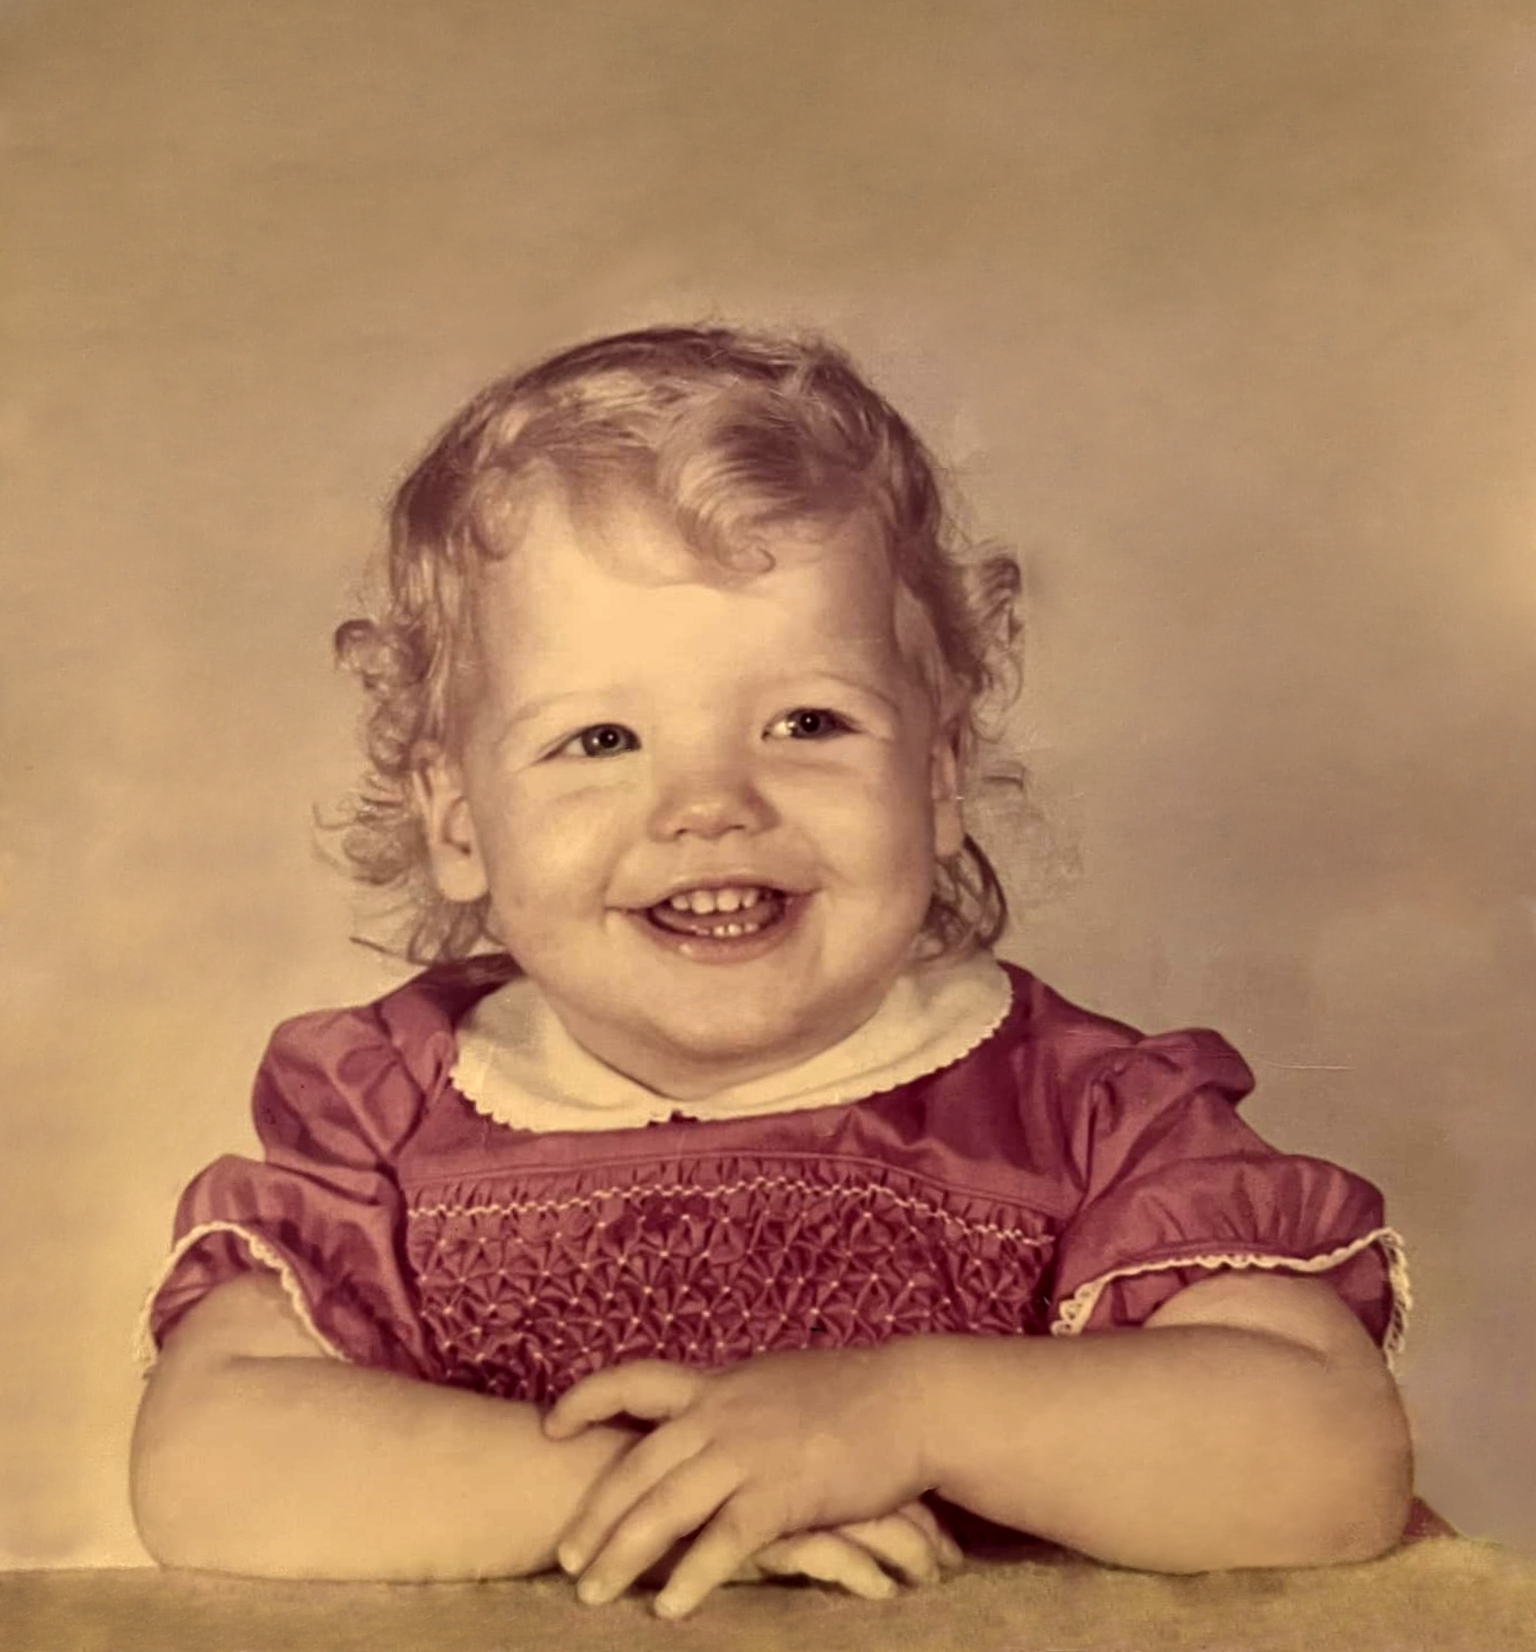
Example 11: Crease and blemish removal
Condition: Blemishes, creases and somewhat faded
Size: 130mm X 173mm
Request: Remove creases, blemishes and restore the vibrancy.
My thanks to Shirley for allowing me to show this.
This one began quite difficult as it hadn’t been scanned, it had been photographed. Would not have been an issue had the image been flat. It wasn’t. It had been creased and become a little curled.
The first job was to straighten the image and bring it back into perspective. Next, the background was cleaned, but without removing the texture of the background. Obviously I couldn’t restore that back to the original, but did leave it reminiscent of. After that, the creases and blemishes were removed, the eye and the fingers being the most difficult areas to recreate accurately.
To finish, the contrast was adjusted to bring back some of the vibrancy the picture would have originally had and also to crop some of the empty space above the girl. It meant losing some of the pictures original size, but I felt brought back the emphasis on the subject.